Chapter8后台管理 — 权限控制
8.1 项目中加入 SpringSecurity 环境
8.1.1 依赖
父工程中版本管理
<properties>
    <!-- 声明属性, 对 Spring 的版本进行统一管理 -->
    <spring.version>5.2.11.RELEASE</spring.version>
    <!-- 声明属性, 对 SpringSecurity 的版本进行统一管理 -->
    <spring.security.version>5.4.2</spring.security.version>
    ...
</properties>
<!-- SpringSecurity 对 Web 应用进行权限管理 --> <!-- https://mvnrepository.com/artifact/org.springframework.security/spring-security-web --> <dependency> <groupId>org.springframework.security</groupId> <artifactId>spring-security-web</artifactId> <version>${spring.security.version}</version> </dependency> <!-- SpringSecurity 配置 --> <!-- https://mvnrepository.com/artifact/org.springframework.security/spring-security-config --> <dependency> <groupId>org.springframework.security</groupId> <artifactId>spring-security-config</artifactId> <version>${spring.security.version}</version> </dependency> <!-- SpringSecurity 标签库 --> <!-- https://mvnrepository.com/artifact/org.springframework.security/spring-security-taglibs --> <dependency> <groupId>org.springframework.security</groupId> <artifactId>spring-security-taglibs</artifactId> <version>${spring.security.version}</version> </dependency>component模块引入依赖
<dependency>
    <groupId>org.springframework.security</groupId>
    <artifactId>spring-security-web</artifactId>
</dependency>
<dependency>
    <groupId>org.springframework.security</groupId>
    <artifactId>spring-security-config</artifactId>
</dependency>
<dependency>
    <groupId>org.springframework.security</groupId>
    <artifactId>spring-security-taglibs</artifactId>
</dependency>
8.1.2 配置 DelegatingFilterProxy
- webui模块 web.xml
- 代码:
<!-- SpringSecurity 的配置,filter-name必须是springSecurityFilterChain -->
<filter>
    <filter-name>springSecurityFilterChain</filter-name>
    <filter-class>org.springframework.web.filter.DelegatingFilterProxy</filter-class>
</filter>
<filter-mapping>
    <filter-name>springSecurityFilterChain</filter-name>
    <url-pattern>/*</url-pattern>
</filter-mapping>
8.1.3 创建基于注解的配置类
- component模块下com/atguigu/crowd/mvc/config包中新建配置类WebAppSecurityConfig.java
- 代码
@Configuration // 当前类为配置类
@EnableWebSecurity  // 启用web环境下权限控制功能
public class WebAppSecurityConfig extends WebSecurityConfigurerAdapter {

}
8.2 SpringSecurity 与 SSM 框架整合
8.2.1 分析
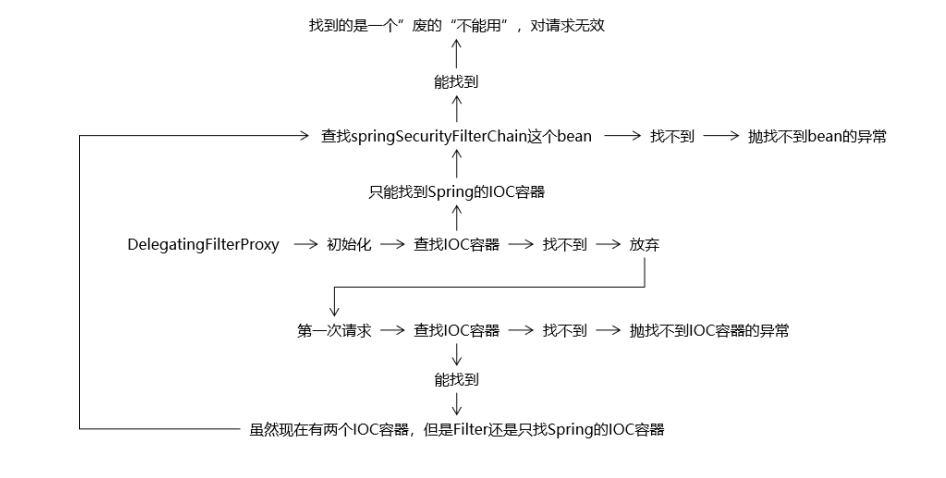
三大组件启动顺序
- ContextLoaderListener 初始化, 创建 Spring 的 IOC 容器
- DelegatingFilterProxy 初始化, 查找 IOC 容器、 查找 bean
- DispatcherServlet 初始化, 创建 SpringMVC 的 IOC 容器
把 WebAppSecurityConfig 放到哪个 IOC 容器中
- Spring的IOC:service、mapper
- SpringMVC的IOC容器:controller(handler)
- 了让 SpringSecurity 能够针对浏览器请求进行权限控制, 需要让SpringMVC 来扫描 WebAppSecurityConfig 类
DelegatingFilterProxy 查找 IOC 容器然后查找 bean 的工作机制
8.2.2 解决方案一
- 思路:把两个 IOC 容器合二为一, 不使用 ContextLoaderListener, 让 DispatcherServlet 加载所有 Spring 配置文件
- DelegatingFilterProxy 在初始化时查找 IOC 容器, 找不到, 放弃。
- 第一次请求时再次查找。
- 找到 SpringMVC 的 IOC 容器。
- 从这个 IOC 容器中找到所需要的 bean
- 缺陷: 会破坏现有程序的结构。 原本是 ContextLoaderListener 和 DispatcherServlet两个组件创建两个 IOC 容器, 现在改成只有一个
- 具体操作
- web.xml中注释掉contextConfigLocation的配置
- springDispatcherServlet的初始化参数
param-value改为spring-*.xml
8.2.3 解决方案二 — 修改源码
思路:修改 DelegatingFilterProxy 的源码,使得
- 初始化时直接跳过查找 IOC 容器的环节
- 第一次请求的时候直接找 SpringMVC 的 IOC 容器
操作
- component模块java目录下新建 org.springframework.web.filter 包
- 新建 DelegatingFilterProxy 类,将原来的DelegatingFilterProxy类内容复制过来
- 修改 initFilterBean 方法,初始化时跳过查找 IOC 容器的环节
@Override protected void initFilterBean() throws ServletException { synchronized (this.delegateMonitor) { if (this.delegate == null) { // If no target bean name specified, use filter name. if (this.targetBeanName == null) { this.targetBeanName = getFilterName(); } // Fetch Spring root application context and initialize the delegate early, // if possible. If the root application context will be started after this // filter proxy, we'll have to resort to lazy initialization. // 修改这里 /*WebApplicationContext wac = findWebApplicationContext(); if (wac != null) { this.delegate = initDelegate(wac); }*/ } } } - 修改
doFilter方法@Override public void doFilter(ServletRequest request, ServletResponse response, FilterChain filterChain) throws ServletException, IOException { // Lazily initialize the delegate if necessary. Filter delegateToUse = this.delegate; if (delegateToUse == null) { synchronized (this.delegateMonitor) { delegateToUse = this.delegate; if (delegateToUse == null) { // 把原来的查找 IOC 容器的代码注释掉 // WebApplicationContext wac = findWebApplicationContext(); // 按我们自己的需要重新编写 // 1.获取 ServletContext 对象 ServletContext sc = this.getServletContext(); // 2.拼接 SpringMVC 将 IOC 容器存入 ServletContext 域的时候使用的属性名 String servletName = "springDispatcherServlet"; String attrName = FrameworkServlet.SERVLET_CONTEXT_PREFIX + servletName; // 3.根据 attrName 从 ServletContext 域中获取 IOC 容器对象 WebApplicationContext wac = (WebApplicationContext)sc.getAttribute(attrName); if (wac == null) { throw new IllegalStateException("No WebApplicationContext found: " + "no ContextLoaderListener or DispatcherServlet registered?"); } delegateToUse = initDelegate(wac); } this.delegate = delegateToUse; } } // Let the delegate perform the actual doFilter operation. invokeDelegate(delegateToUse, request, response, filterChain); }
8.3 配置 SpringSecurity
8.3.1 放行登录页和静态资源
- 在 SpringSecurity 的配置类 WebAppSecurityConfig 中重写 configure(HttpSecuritysecurity)方法并设置
- 代码
@Override
protected void configure(HttpSecurity security) throws Exception {

    security
            .authorizeRequests()                            // 对请求进行授权
            .antMatchers("/admin/to/login.do")  // 针对登录页进行设置
            .permitAll()
            .antMatchers("/bootstrap/**")       // 针对静态资源进行设置, 无条件访问
            .permitAll()
            .antMatchers("/css/**")
            .permitAll()
            .antMatchers("/fonts/**")
            .permitAll()
            .antMatchers("/img/**")
            .permitAll()
            .antMatchers("/jquery/**")
            .permitAll()
            .antMatchers("/js/**")
            .permitAll()
            .antMatchers("/layer/**")
            .permitAll()
            .antMatchers("/script/**")
            .permitAll()
            .antMatchers("/ztree/**")
            .permitAll()
            .anyRequest()
            .authenticated();

}
8.3.2 提交登录表单做内存认证
- 思路
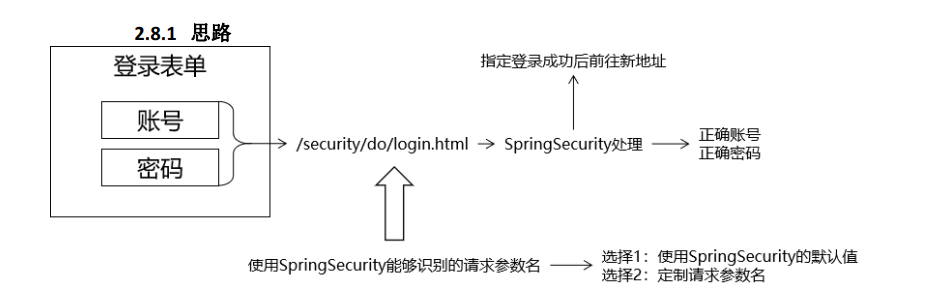
- 修改 admin-login.jsp
<form action="security/do/login.do" method="post" class="form-signin" role="form"> <h2 class="form-signin-heading"><i class="glyphicon glyphicon-log-in"></i>管理员登录</h2> <p>${requestScope.exception.message}</p> <p>${SPRING_SECURITY_LAST_EXCEPTION.message }</p> - SpringSecurity 配置
@Override protected void configure(HttpSecurity security) throws Exception { security .authorizeRequests() // 对请求进行授权 .antMatchers("/admin/to/login.do") // 针对登录页进行设置 .permitAll() .antMatchers("/bootstrap/**") // 针对静态资源进行设置, 无条件访问 .permitAll() .antMatchers("/css/**") .permitAll() .antMatchers("/fonts/**") .permitAll() .antMatchers("/img/**") .permitAll() .antMatchers("/jquery/**") .permitAll() .antMatchers("/js/**") .permitAll() .antMatchers("/layer/**") .permitAll() .antMatchers("/script/**") .permitAll() .antMatchers("/ztree/**") .permitAll() .anyRequest() .authenticated() .and() .csrf().disable() // 关闭防跨站请求伪造 .formLogin() // 开启表单登录功能 .loginPage("/admin/to/login.do") // 指定登录页面 .loginProcessingUrl("/security/do/login.do") // 指定处理登录请求的地址 .defaultSuccessUrl("/admin/to/main.do") // 指定登录成功后前往的地址 .usernameParameter("loginAcct") // 账号的请求参数名称 .passwordParameter("userPswd") // 密码的请求参数名称 ; } - 关闭自定义的拦截器:spring-web-mvc.xml
<!-- 使用SpringSecurity后,当前自定义的登录拦截器不再使用 <!–注册拦截器–> <mvc:interceptors> <mvc:interceptor> <!–要拦截的路径–> <mvc:mapping path="/**"/> <!–不拦截的资源–> <mvc:exclude-mapping path="/admin/to/login.do"/> <mvc:exclude-mapping path="/admin/do/login.do"/> <mvc:exclude-mapping path="/admin/do/logout.do"/> <mvc:exclude-mapping path="/test/**"/> <!–配置拦截器类–> <bean class="com.atguigu.crowd.mvc.interceptor.LoginInterceptor"/> </mvc:interceptor> </mvc:interceptors> -->
8.3.3 退出登录
前端代码:
<li><a href="security/do/logout.do"><i class="glyphicon glyphicon-off"></i> 退出系统</a></li>后端代码
.and()
.logout()                                       // 退出登录功能
.logoutUrl("/security/do/logout.do")
.logoutSuccessUrl("/security/do/login.do")
;
8.3.4 把内存登录改成数据库登录
思路
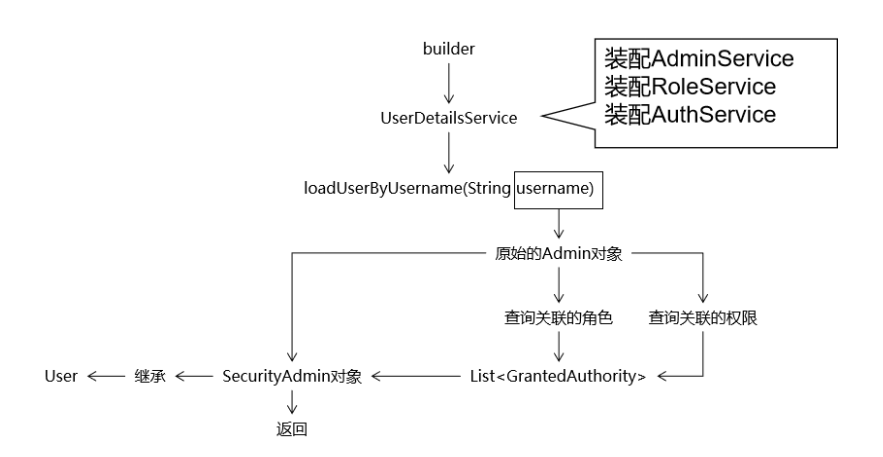
根据 adminId 查询已分配的角色(可以用之前的方法):
// RoleService
List<Role> getAssignedRole(Integer adminId);
根据 adminId 查询已分配权限
// AuthService
List<String> getAssignedAuthNameByAdminId(Integer adminId);
// AuthServiceImpl @Override public List<String> getAssignedAuthNameByAdminId(Integer adminId) { return authMapper.selectAssignedAuthNameByAdminId(adminId); }// AuthMapper List<String> selectAssignedAuthNameByAdminId(Integer adminId);<!-- AuthMapper.xml --> <select id="selectAssignedAuthNameByAdminId" resultType="string"> select distinct t_auth.name from t_auth left join inner_role_auth on t_auth.id=inner_role_auth.auth_id left join inner_admin_role iar on inner_role_auth.role_id = iar.role_id where iar.admin_id=#{adminId} AND t_auth.name != "" AND t_auth.name IS NOT NULL; </select>创建 SecurityAdmin 类
// config包下
public class SecurityAdmin extends User {

    private static final long serialVersionUID = 1L;

    // 原始的 Admin 对象, 包含 Admin 对象的全部属性
    private Admin originalAdmin;

    public SecurityAdmin(Admin originalAdmin, List<GrantedAuthority> authorities) {
        super(originalAdmin.getLogin(), originalAdmin.getUserPswd(), authorities);
        this.originalAdmin = originalAdmin;
    }

    // 对外提供的获取原始 Admin 对象的 getXxx()方法
    public Admin getOriginalAdmin() {
        return originalAdmin;
    }

}
根据账号查询 Admin
// AdminService
Admin getAdminByLoginAcct(String username);
@Override public Admin getAdminByLoginAcct(String username) { AdminExample example = new AdminExample(); Criteria criteria = example.createCriteria(); criteria.andLoginEqualTo(username); return adminMapper.selectByExample(example).get(0); }创建
UserDetailsService实现类// config包下 @Component public class CrowdUserDetailsService implements UserDetailsService { @Autowired private AdminService adminService; @Autowired private RoleService roleService; @Autowired private AuthService authService; @Override public UserDetails loadUserByUsername(String username) throws UsernameNotFoundException { // 1.根据账号名称查询Admin对象 Admin admin = adminService.getAdminByLoginAcct(username); // 2.获取adminId Integer adminId = admin.getId(); // 3.根据adminId查询角色信息 List<Role> assignedRoleList = roleService.getAssignedRole(adminId); // 4.根据 adminId 查询权限信息 List<String> authNameList = authService.getAssignedAuthNameByAdminId(adminId); // 5.创建集合用来存储 GrantedAuthority List<GrantedAuthority> authorities = new ArrayList<>(); // 6.遍历 assignedRoleList 存入角色信息 for (Role role:assignedRoleList) { String roleName = "ROLE_"+role.getName(); SimpleGrantedAuthority simpleGrantedAuthority = new SimpleGrantedAuthority(roleName); authorities.add(simpleGrantedAuthority); } // 7.遍历 authNameList 存入权限信息 for (String authName: authNameList) { SimpleGrantedAuthority simpleGrantedAuthority = new SimpleGrantedAuthority(authName); authorities.add(simpleGrantedAuthority); } // 8.封装 SecurityAdmin 对象 SecurityAdmin securityAdmin = new SecurityAdmin(admin, authorities); return securityAdmin; } }在配置类中使用 UserDetailsService
@Autowired
private UserDetailsService userDetailsService;

@Override
protected void configure(AuthenticationManagerBuilder builder) throws Exception {

    builder
            .userDetailsService(userDetailsService)
            .passwordEncoder(NoOpPasswordEncoder.getInstance());
}
8.3.5 密码加密
修改 t_admin 表
# 修改t_admin表 密码长度
ALTER TABLE t_admin MODIFY user_pswd CHAR(100) NOT NULL;
spring-persist-tx.xml 文件中配置bean
<!-- 配置 BCryptPasswordEncoder -->
<bean id="passwordEncoder" class="org.springframework.security.crypto.bcrypt.BCryptPasswordEncoder"/>
配置类
@Autowired
private PasswordEncoder passwordEncoder;

// ....

@Override
protected void configure(AuthenticationManagerBuilder builder) throws Exception {

    builder
            .userDetailsService(userDetailsService)
            .passwordEncoder(passwordEncoder);
}
修改 AdminServiceImpl
@Autowired
private PasswordEncoder passwordEncoder;

@Override
public void saveAdmin(Admin admin) {
    // 密码加密
    String userPswd = admin.getUserPswd();
    admin.setUserPswd(passwordEncoder.encode(userPswd));

    // ...
8.3.6 在页面上显示用户昵称
- 前端页面:include-nav.jsp
<%@taglib prefix="security" uri="http://www.springframework.org/security/tags" %><%--${sessionScope.loginAdmin.userName}--%> <security:authentication property="principal.originalAdmin.userName"/> - SpringSecurity 处理完登录操作之后把登录成功的 User 对象以 principal 属性名存入了
UsernamePasswordAuthenticationToken对象
8.3.7 密码的擦除
SpringSecurity 是会自动把 User 对象中的密码部分擦除
   // User 源码,实现了 CredentialsContainer 接口中的eraseCredentials方法
@Override
public void eraseCredentials() {
	this.password = null;
}
我们创建 SecurityAdmin 对象扩展了 User 对象, User 对象中的密码被擦除了,但是原始 Admin 对象中的密码没有擦除
修改 SecurityAdmin,将原始 Admin 对象中的密码擦除
public SecurityAdmin(Admin originalAdmin, List<GrantedAuthority> authorities) {
    super(originalAdmin.getLogin(), originalAdmin.getUserPswd(), authorities);

    // 给本类的 this.originalAdmin 赋值
    this.originalAdmin = originalAdmin;

    // 将原始 Admin 对象中的密码擦除,密码已经传给父类User构造器,因此这里擦除不影响
    this.originalAdmin.setUserPswd(null);
}
8.3.8 权限控制
1. 准备工作
修改 t_auth 表
INSERT INTO t_auth(id,`name`,title,category_id) VALUES(8,'user:save','保存',1);管理员
- 启动服务器,登录后 -> 权限管理 -> 用户维护
- 新增管理员 adminOperator、roleOperator
分配角色
- 为 adminOperator 分配 经理、经理操作者角色
- 为 roleOperator 分配 部长、部长操作者角色
分配权限
- 为经理操作者分配保存权限
- 为部长操作者分配删除权限
2. 测试
- 测试一
- 要求:访问 Admin 分页功能时具备“经理” 角色
- 代码
.antMatchers("/admin/get/page.do")
.hasRole("经理")
.anyRequest()                                   // 其它任意请求
.authenticated()                                // 认证登录后访问
- 测试二
- 要求:访问 Role 的分页功能时具备“部长” 角色
- 代码
// WebAppSecurityConfig
@EnableGlobalMethodSecurity(prePostEnabled = true) // 启用全局方法权限控制功能, 并且设置 prePostEnabled = true。 保证@PreAuthority、@PostAuthority、 @PreFilter、 @PostFilter 生效
public class WebAppSecurityConfig extends WebSecurityConfigurerAdapter {
// RoleHandler @PreAuthorize("hasRole('部长')") @RequestMapping("/role/get/page/info.do") public ResultEntity<PageInfo<Role>> getPageInfo(@RequestParam(value = "pageNum", defaultValue = "1") Integer pageNum, @RequestParam(value = "pageSize", defaultValue = "5") Integer pageSize, @RequestParam(value = "keyword", defaultValue = "") String keyword) { - 完善基于注解的异常映射:修改CrowdExceptionResolver.java的resolveAccessForbiddenException方法
// 未登录异常 @ExceptionHandler(value = Exception.class) public ModelAndView resolveException(Exception exception, HttpServletRequest request, HttpServletResponse response) throws IOException { String viewName = "admin-login"; return commonResolve(viewName,exception,request,response); } - 自定义403页面
.anyRequest()                                   // 其它任意请求
.authenticated()                                // 认证登录后访问
.and()
.exceptionHandling()
.accessDeniedHandler((request, response, e) -> {
    request.setAttribute("exception", new Exception(CrowdConstant.MESSAGE_ACCESS_DENIED));
    request.getRequestDispatcher("/WEB-INF/system-error.jsp").forward(request, response);
})
- 测试三
- 要求: 访问 Admin 保存功能时具备 user:save 权限
- 代码:AdminHandler
@PreAuthorize("hasAuthority('user:save')")
@RequestMapping("/admin/save.do")
public String save(Admin admin) {
- 测试 4
- 要求: 访问 Admin 分页功能时具备“经理” 角色或“user:get” 权限二者之一
- 代码
.antMatchers("/admin/get/page.do")
.access("hasRole('经理') OR hasAuthority('user:get')")
//.hasAuthority("user:get")
8.3.9 页面元素的权限控制
说明
- 页面上的局部元素, 根据访问控制规则进行控制
- 通过
security:authorize标签进行控制
代码
<!-- admin-main.jsp -->
<security:authorize access="hasRole('经理')">
    <div class="col-xs-6 col-sm-3 placeholder">
        <img data-src="holder.js/200x200/auto/sky" class="img-responsive" alt="Generic placeholder thumbnail">
        <h4>Label</h4>
        <span class="text-muted">Something else</span>
    </div>
</security:authorize>
修改源码
- 新建 org.springframework.security.taglibs.authz.AbstractAuthorizeTag 类
- 复制原来的内容到该类中
- 修改:
private SecurityExpressionHandler<FilterInvocation> getExpressionHandler() throws IOException { // ApplicationContext appContext = SecurityWebApplicationContextUtils.findRequiredWebApplicationContext(getServletContext()); // 1.获取 ServletContext 对象 ServletContext servletContext = getServletContext(); // 2.拼接 SpringMVC 在 ServletContext 域中的属性名 String attrName = FrameworkServlet.SERVLET_CONTEXT_PREFIX + "springDispatcherServlet"; // 3.从 ServletContext 域中获取 IOC 容器对象 ApplicationContext appContext = (ApplicationContext)servletContext.getAttribute(attrName); Map<String, SecurityExpressionHandler> handlers = appContext.getBeansOfType(SecurityExpressionHandler.class); - 效果:仅具有经理角色的用户能看到该组件