Chapter7后台管理 — SpringSecurity
7.1 SpringSecurity简介
7.2 纯注解开发 — 配置类
7.3 环境配置
7.3.1 基础环境搭建
- 新建module,选择空的Maven工程:pro2-spring-security
- 添加框架-web
- 选择打包方式、添加依赖
<modelVersion>4.0.0</modelVersion> <packaging>war</packaging> <groupId>com.atguigu.crowd</groupId> <artifactId>pro2-spring-security</artifactId> <version>1.0-SNAPSHOT</version> <properties> <maven.compiler.source>1.8</maven.compiler.source> <maven.compiler.target>1.8</maven.compiler.target> </properties> <dependencies> <dependency> <groupId>org.springframework</groupId> <artifactId>spring-webmvc</artifactId> <version>5.2.11.RELEASE</version> </dependency> <!-- 引入 Servlet 容器中相关依赖 --> <dependency> <groupId>javax.servlet</groupId> <artifactId>javax.servlet-api</artifactId> <version>3.1.0</version> <scope>provided</scope> </dependency> <!-- JSP 页面使用的依赖 --> <dependency> <groupId>javax.servlet.jsp.jstl</groupId> <artifactId>jstl-api</artifactId> <version>1.2</version> <scope>provided</scope> </dependency> </dependencies> - resources目录下新建 spring-mvc.xml
<?xml version="1.0" encoding="UTF-8"?> <beans xmlns="http://www.springframework.org/schema/beans" xmlns:xsi="http://www.w3.org/2001/XMLSchema-instance" xmlns:context="http://www.springframework.org/schema/context" xmlns:mvc="http://www.springframework.org/schema/mvc" xsi:schemaLocation="http://www.springframework.org/schema/beans http://www.springframework.org/schema/beans/spring-beans.xsd http://www.springframework.org/schema/context https://www.springframework.org/schema/context/spring-context.xsd http://www.springframework.org/schema/mvc https://www.springframework.org/schema/mvc/spring-mvc.xsd"> <context:component-scan base-package="com.atguigu.security"/> <bean class="org.springframework.web.servlet.view.InternalResourceViewResolver"> <property name="prefix" value="/WEB-INF/views/"/> <property name="suffix" value=".jsp"/> </bean> <mvc:annotation-driven /> <mvc:default-servlet-handler /> </beans> - 在 web.xml 中配置 DispatcherServlet
<!-- 配置 SpringMVC 的前端控制器 --> <servlet> <servlet-name>springDispatcherServlet</servlet-name> <servlet-class>org.springframework.web.servlet.DispatcherServlet</servlet-class> <init-param> <param-name>contextConfigLocation</param-name> <param-value>classpath:spring-mvc.xml</param-value> </init-param> <load-on-startup>1</load-on-startup> </servlet> <servlet-mapping> <!-- DispatcherServlet 映射的 URL 地址 --> <servlet-name>springDispatcherServlet</servlet-name> <url-pattern>/</url-pattern><!--拦截所有请求--> </servlet-mapping> - controller
- 新建 com/atguigu/security/controller 包
- 将 两个类复制到该包下
- 加入 webapp 目录下文件
7.3.2 加入 SpringSecurity
加入依赖
<!-- SpringSecurity 对 Web 应用进行权限管理 -->
<dependency>
    <groupId>org.springframework.security</groupId>
    <artifactId>spring-security-web</artifactId>
    <version>5.4.2</version>
</dependency>
<!-- SpringSecurity 配置 -->
<dependency>
    <groupId>org.springframework.security</groupId>
    <artifactId>spring-security-config</artifactId>
    <version>5.4.2</version>
</dependency>
<!-- SpringSecurity 标签库 -->
<dependency>
    <groupId>org.springframework.security</groupId>
    <artifactId>spring-security-taglibs</artifactId>
    <version>5.4.2</version>
</dependency>
web.xml中配置过滤器
<filter>
    <filter-name>springSecurityFilterChain</filter-name>
    <filter-class>org.springframework.web.filter.DelegatingFilterProxy</filter-class>
</filter>
<filter-mapping>
    <filter-name>springSecurityFilterChain</filter-name>
    <url-pattern>/*</url-pattern>
</filter-mapping>
新建配置类:com/atguigu/security/config/WebApplicationConfig.java
@Configuration
@EnableWebSecurity // 启用web环境下权限控制功能
public class WebApplicationConfig extends WebSecurityConfigurerAdapter {
}
7.4 SpringSecurity 操作实验
7.4.1 放行首页和静态资源
- 配置类
@Override
protected void configure(HttpSecurity security) throws Exception {

    security
        .authorizeRequests()                        // 对请求进行授权
            .antMatchers("/index.jsp")    // 针对 /index.jsp 路径进行授权
            .permitAll()                            // 可以无条件访问
            .antMatchers("/layui/**")
            .permitAll()
            .and()
            .authorizeRequests()
            .anyRequest()                            // 任意请求
            .authenticated()                         // 需要登录以后才可以访问
            ;
}
7.4.2 未认证请求跳转到登录页
- 配置类
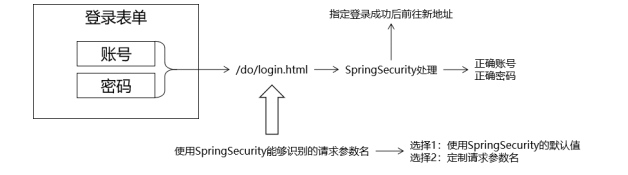
@Override protected void configure(HttpSecurity security) throws Exception { security .authorizeRequests() // 对请求进行授权 .antMatchers("/index.jsp") // 针对 /index.jsp 路径进行授权 .permitAll() // 可以无条件访问 .antMatchers("/layui/**") .permitAll() .and() .authorizeRequests() .anyRequest() // 任意请求 .authenticated() // 需要登录以后才可以访问 .and() .formLogin() // 使用表单形式登录 .loginPage("/index.jsp") // 指定登录页面,不指定则访问SpringSecurity自带的登录页 .loginProcessingUrl("/do/login.html") // 指定提交登录表单的地址,设置后则覆盖loginPage设置的的默认值 .permitAll() // 允许访问登录地址 ; } loginPage()- 指定登录页的同时会影响到:“提交登录表单的地址”、“退出登录地址”、“登录失败地址”
- /login GET - the login form
- /login POST - process the credentials and if valid authenticate the user
- /login?error GET - redirect here for failed authentication attempts
- /login?logout GET - redirect here after successfully logging out
7.4.3 设置登录系统的账号、 密码
思路
页面设置-index
<p>${SPRING_SECURITY_LAST_EXCEPTION.message}</p>
<form action="${pageContext.request.contextPath }/do/login.html" method="post">
<input type="hidden" name="${_csrf.parameterName}" value="${_csrf.token}"/>
<div class="layadmin-user-login-main">

....
        <div class="layui-form-item">
            <label
                    class="layadmin-user-login-icon layui-icon layui-icon-password"
                    for="LAY-user-login-password"></label> <input type="text"
                                                                  name="userPswd" id="LAY-user-login-password" lay-verify="required"
                                                                  placeholder="密码" class="layui-input">
        </div>

......

</form>

<div class="layui-trans layadmin-user-login-footer">
后端设置
@Override protected void configure(HttpSecurity security) throws Exception { security .authorizeRequests() // 对请求进行授权 .antMatchers("/index.jsp") // 针对 /index.jsp 路径进行授权 .permitAll() // 可以无条件访问 .antMatchers("/layui/**") .permitAll() .and() .authorizeRequests() .anyRequest() // 任意请求 .authenticated() // 需要登录以后才可以访问 .and() .formLogin() // 使用表单形式登录 .loginPage("/index.jsp") // 指定登录页面,不指定则访问SpringSecurity自带的登录页 .loginProcessingUrl("/do/login.html") // 指定提交登录表单的地址,设置后则覆盖loginPage设置的的默认值 .usernameParameter("loginAcct") // 指定登录账号请求参数名 .passwordParameter("userPswd") // 指定登录密码的请求参数名 .defaultSuccessUrl("/main.html") // 设置登录成功后默认前往的URL地址 ; } @Override protected void configure(AuthenticationManagerBuilder builder) throws Exception { builder .inMemoryAuthentication() // 在内存中完成账号、密码的检查 .passwordEncoder(new BCryptPasswordEncoder()) .withUser("tom") // 指定账号 .password(new BCryptPasswordEncoder().encode("123456")) // 指定密码 .roles("ADMIN") // 指定当前用户角色 .and() .withUser("jerry") .password(new BCryptPasswordEncoder().encode("123456")) .authorities("UPDATE") // 也可以指定权限 ; }- 注意 SpringSecurity5以后要求指定密码加密格式
7.4.4 用户注销
- 后端
.defaultSuccessUrl("/main.html") // 设置登录成功后默认前往的URL地址 .and() // .csrf().disable() // 禁用csrf .logout() .logoutUrl("/do/logout.html") .logoutSuccessUrl("/index.jsp") ; - include/navbar.jsp
<li class="layui-nav-item">
    <form id="logoutForm" action="${pageContext.request.contextPath }/do/logout.html" method="post">
    ...
7.4.5 基于角色或权限进行访问控制
- 说明
- 通过 hasRole、hasAuthority 设置查看限制
- 要在anyRequest之前设置
- 代码
@Override
protected void configure(HttpSecurity security) throws Exception {

    security
        .authorizeRequests()                        // 对请求进行授权
            .antMatchers("/index.jsp")    // 针对 /index.jsp 路径进行授权
            .permitAll()                            // 可以无条件访问
            .antMatchers("/layui/**")
            .permitAll()
            .antMatchers("/level1/**").hasRole("学徒")  // 要求具有学徒角色的用户才能访问level1下的资源
            .antMatchers("/level2/**").hasAuthority("查看") // 要求具有查看权限的用户才能访问level2下的资源
            .and()
            .authorizeRequests()
            .anyRequest()                            // 任意请求
            .authenticated()                         // 需要登录以后才可以访问
            .and()
            .formLogin()                             // 使用表单形式登录
            .loginPage("/index.jsp")                 // 指定登录页面,不指定则访问SpringSecurity自带的登录页
            .loginProcessingUrl("/do/login.html")    // 指定提交登录表单的地址,设置后则覆盖loginPage设置的的默认值
            .usernameParameter("loginAcct")          // 指定登录账号请求参数名
            .passwordParameter("userPswd")           // 指定登录密码的请求参数名
            .defaultSuccessUrl("/main.html")         // 设置登录成功后默认前往的URL地址
            .and()
            // .csrf().disable()                        // 禁用csrf
            .logout()
            .logoutUrl("/do/logout.html")
            .logoutSuccessUrl("/index.jsp")
            ;
}

@Override
protected void configure(AuthenticationManagerBuilder builder) throws Exception {

    builder
            .inMemoryAuthentication()           // 在内存中完成账号、密码的检查
            .passwordEncoder(new BCryptPasswordEncoder())
            .withUser("tom")           // 指定账号
            .password(new BCryptPasswordEncoder().encode("123456"))                 // 指定密码
            .roles("ADMIN","学徒")                     // 指定当前用户角色
            .and()
            .withUser("jerry")
            .password(new BCryptPasswordEncoder().encode("123456"))
            .authorities("UPDATE","查看")              // 也可以指定权限
            ;
}
7.4.6 自定义 403 错误页面
- 代码
@Override
protected void configure(HttpSecurity security) throws Exception {

    security
        .authorizeRequests()                        // 对请求进行授权
            .antMatchers("/index.jsp")    // 针对 /index.jsp 路径进行授权
            .permitAll()                            // 可以无条件访问
            .antMatchers("/layui/**")
            .permitAll()
            .antMatchers("/level1/**").hasRole("学徒")  // 要求具有学徒角色的用户才能访问level1下的资源
            .antMatchers("/level2/**").hasAuthority("查看") // 要求具有查看权限的用户才能访问level2下的资源
            .and()
            .authorizeRequests()
            .anyRequest()                            // 任意请求
            .authenticated()                         // 需要登录以后才可以访问
            .and()
            .formLogin()                             // 使用表单形式登录
            .loginPage("/index.jsp")                 // 指定登录页面,不指定则访问SpringSecurity自带的登录页
            .loginProcessingUrl("/do/login.html")    // 指定提交登录表单的地址,设置后则覆盖loginPage设置的的默认值
            .usernameParameter("loginAcct")          // 指定登录账号请求参数名
            .passwordParameter("userPswd")           // 指定登录密码的请求参数名
            .defaultSuccessUrl("/main.html")         // 设置登录成功后默认前往的URL地址
            .and()
            // .csrf().disable()                        // 禁用csrf
            .logout()
            .logoutUrl("/do/logout.html")
            .logoutSuccessUrl("/index.jsp")
            .and()
            .exceptionHandling()                       // 指定异常处理器
            //.accessDeniedPage("/to/no/auth/page.html") // 方式一:访问被拒绝时前往的页面
            // 方式二:
            .accessDeniedHandler(new AccessDeniedHandler() {
                @Override
                public void handle(HttpServletRequest httpServletRequest, HttpServletResponse httpServletResponse, AccessDeniedException e) throws IOException, ServletException {
                    httpServletRequest.setAttribute("message", "抱歉!您无法访问这个资源");
                    httpServletRequest.getRequestDispatcher("/WEB-INF/views/no_auth.jsp").forward(httpServletRequest,httpServletResponse);
                }
            })
            ;
}
7.4.7 记住我-内存版(不重要)
- 说明
- HttpSecurity 对象调用 rememberMe()方法
- 使用rememberMeParameter()方法定制请求参数名
- 默认为remember-me
- index.jsp
<input type="checkbox" name="remember-me" lay-skin="primary" title="记住我"> <a href="forget.html" class="layadmin-user-jump-change layadmin-link" style="margin-top: 7px;">忘记密码?</a> - 代码
.and()
.rememberMe()
;
7.4.8 记住我-数据库版(不重要)
加入依赖
<dependency>
    <groupId>mysql</groupId>
    <artifactId>mysql-connector-java</artifactId>
    <version>8.0.21</version>
</dependency>
<!-- 数据源 -->
<!-- https://mvnrepository.com/artifact/com.alibaba/druid -->
<dependency>
    <groupId>com.alibaba</groupId>
    <artifactId>druid</artifactId>
    <version>1.2.3</version>
</dependency>
<dependency>
    <groupId>org.springframework</groupId>
    <artifactId>spring-orm</artifactId>
    <version>5.2.11.RELEASE</version>
</dependency>
mvc配置文件
<!--配置数据源-->
<bean id="dataSource" class="com.alibaba.druid.pool.DruidDataSource" destroy-method="close" init-method="init">
    <property name="username" value="${jdbc.username}"/>
    <property name="password" value="${jdbc.password}"/>
    <property name="url" value="${jdbc.url}"/>
    <property name="driverClassName" value="${jdbc.driver}"/>
</bean>

<!-- jdbcTemplate-->
<bean id="jdbcTemplate" class="org.springframework.jdbc.core.JdbcTemplate">
    <property name="dataSource" ref="dataSource"/>
</bean>
数据库
# SpringSecurity
CREATE DATABASE `security` CHARACTER SET utf8;
USE security;
CREATE TABLE persistent_logins (
                                username VARCHAR (64) NOT NULL,
                                series VARCHAR (64) PRIMARY KEY,
                                token VARCHAR (64) NOT NULL,
                                last_used TIMESTAMP NOT NULL
);
自动装配:WebAppSecurityConfig
@Autowired
private DataSource dataSource;
启动令牌仓库功能
@Override
protected void configure(HttpSecurity security) throws Exception {

    JdbcTokenRepositoryImpl tokenRepository = new JdbcTokenRepositoryImpl();
    tokenRepository.setDataSource(dataSource);

    security
        .authorizeRequests()                        // 对请求进行授权
    // ...
    .and()
    .rememberMe()
    .tokenRepository(tokenRepository)
    ;
7.4.9 查询数据库完成认证
- SpringSecurity 默认实现
SpringSecurity 的默认实现已经将 SQL 语句硬编码在了JdbcDaoImpl类中。 这种情况下, 我们有下面三种选择- 按照
JdbcDaoImpl类中 SQL 语句设计表结构。 - 修改
JdbcDaoImpl类的源码。 - 不使用
jdbcAuthentication()。
- 按照
- 自定义数据库查询方式
- 步骤
- 手动写一个
UserDetailsService接口的实现类并自动装配 - configure方法中
builder.userDetailsService(userDetailsService)调用
- 手动写一个
- 代码:config目录下新建MyUserDetailsService类
@Component
public class MyUserDetailsService implements UserDetailsService {

    @Autowired
    private JdbcTemplate jdbcTemplate;

    @Override
    public UserDetails loadUserByUsername(String username) throws UsernameNotFoundException {

        // 1.从数据库查询Admin对象
        String sql = "SELECT id, loginacct, userpswd, username, email FROM security.t_admin WHERE loginacct=?";

        List<Admin> list = jdbcTemplate.query(sql, new BeanPropertyRowMapper<>(Admin.class), username);

        Admin admin = list.get(0);

        // 2.给Admin设置角色权限信息
        List<GrantedAuthority> authorities = new ArrayList<>();

        authorities.add(new SimpleGrantedAuthority("ROLE_ADMIN"));
        authorities.add(new SimpleGrantedAuthority("UPDATE"));

        // 3.把admin对象和authorities封装到UserDetails中
        String userpswd = admin.getUserpswd();
        return new User(username, userpswd, authorities);
    }
}
- 步骤
- 新建数据库表
DROP TABLE IF EXISTS t_admin; CREATE TABLE t_admin( id INT NOT NULL AUTO_INCREMENT, loginacct VARCHAR(255) NOT NULL, userpswd CHAR(32) NOT NULL, username VARCHAR(255) NOT NULL, email VARCHAR(255) NOT NULL, createtime CHAR(19), PRIMARY KEY (id) ); - 使用自定义 UserDetailsService 完成登录
@Autowired
private MyUserDetailsService userDetailsService;

@Override
protected void configure(AuthenticationManagerBuilder builder) throws Exception {

    /*
    builder
            .inMemoryAuthentication()           // 在内存中完成账号、密码的检查
            .passwordEncoder(new BCryptPasswordEncoder())
            .withUser("tom")           // 指定账号
            .password(new BCryptPasswordEncoder().encode("123456"))                 // 指定密码
            .roles("ADMIN","学徒")                     // 指定当前用户角色
            .and()
            .withUser("jerry")
            .password(new BCryptPasswordEncoder().encode("123456"))
            .authorities("UPDATE","查看")              // 也可以指定权限
            ;
    */
    builder
            .userDetailsService(userDetailsService)
            // .passwordEncoder(new BCryptPasswordEncoder())
            .passwordEncoder(NoOpPasswordEncoder.getInstance()) // 明文密码
            ;
}
7.4.10 应用自定义密码加密规则
- 说明
- SpringSecurity提供PasswordEncoder接口可以自定义加密方式
- PasswordEncoder常用实现类
BCryptPasswordEncoder:Spring Security 推荐使用的,使用BCrypt强哈希方法来加密。MessageDigestPasswordEncoder:用作传统的加密方式加密(支持 MD5、SHA-1、SHA-256…)DelegatingPasswordEncoder:最常用的,根据加密类型id进行不同方式的加密,兼容性强NoOpPasswordEncoder:明文,不做加密
- 自定义实现类:重写encode和matches方法
- 使用
@Autowired
private PasswordEncoder passwordEncoder;

@Bean
public BCryptPasswordEncoder getBCryptPasswordEncoder() {
    return new BCryptPasswordEncoder();
}
@Override
protected void configure(AuthenticationManagerBuilder builder) throws Exception {

    builder
            .userDetailsService(userDetailsService)
            .passwordEncoder(passwordEncoder)
            ;
}