Chapter9分布式 — SpringBoot快速入门
1. 环境搭建
1.1 通过Maven搭建
新建Maven工程
引入SpringBoot 依赖
<?xml version="1.0" encoding="UTF-8"?>
<project xmlns="http://maven.apache.org/POM/4.0.0"
        xmlns:xsi="http://www.w3.org/2001/XMLSchema-instance"
        xsi:schemaLocation="http://maven.apache.org/POM/4.0.0 http://maven.apache.org/xsd/maven-4.0.0.xsd">
    <modelVersion>4.0.0</modelVersion>

    <groupId>com.atguigu.crowd</groupId>
    <artifactId>pro03-springboot</artifactId>
    <version>1.0-SNAPSHOT</version>

    <properties>
        <maven.compiler.source>1.8</maven.compiler.source>
        <maven.compiler.target>1.8</maven.compiler.target>
    </properties>

    <parent>
        <groupId>org.springframework.boot</groupId>
        <artifactId>spring-boot-starter-parent</artifactId>
        <version>2.4.1</version>
    </parent>

    <dependencies>
        <dependency>
            <groupId>org.springframework.boot</groupId>
            <artifactId>spring-boot-starter</artifactId>
        </dependency>

        <dependency>
            <groupId>org.springframework.boot</groupId>
            <artifactId>spring-boot-starter-web</artifactId>
        </dependency>

        <dependency>
            <groupId>org.springframework.boot</groupId>
            <artifactId>spring-boot-starter-test</artifactId>
            <scope>test</scope>
        </dependency>
    </dependencies>

    <!-- Maven构建过程相关配置 -->
    <build>
        <!-- 构建过程中所需要用到的插件 -->
        <plugins>
            <!-- 将SpringBoot应用打包成可执行的jar包 -->
            <plugin>
                <groupId>org.springframework.boot</groupId>
                <artifactId>spring-boot-maven-plugin</artifactId>
            </plugin>
        </plugins>
    </build>

</project>
创建启动类
package com.atguigu.spring.boot;

import org.springframework.boot.SpringApplication;
import org.springframework.boot.autoconfigure.SpringBootApplication;

@SpringBootApplication
public class DemoApplication {

    public static void main(String[] args) {
        SpringApplication.run(DemoApplication.class,args);
    }
}
创建 handler 类
package com.atguigu.spring.boot;

import org.springframework.web.bind.annotation.RequestMapping;
import org.springframework.web.bind.annotation.RestController;

@RestController
public class HelloHandler {

    @RequestMapping("/get/spring/boot/hello/message")
    public String getMessage() {
        return "First test!";
    }
}
启动
- IDEA右侧打开Maven工具栏
- 项目名称 -> Plugins -> springboot -> spring-boot:run
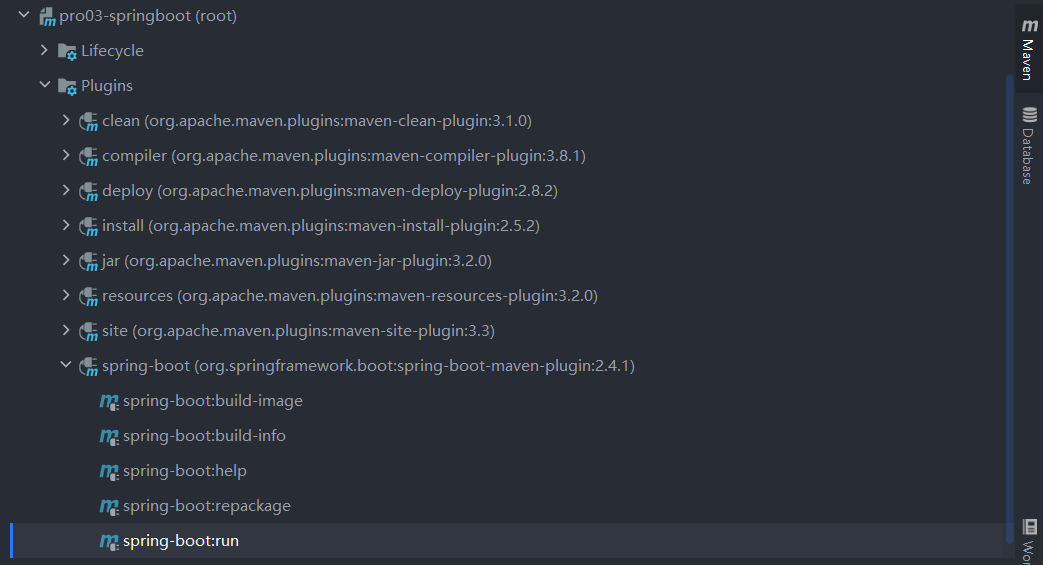
- 浏览器输入 http://localhost:8080//get/spring/boot/hello/message 访问
1.2 通过 Spring插件创建
- 新建 Module -> Spring Initializer

- 配置相关信息
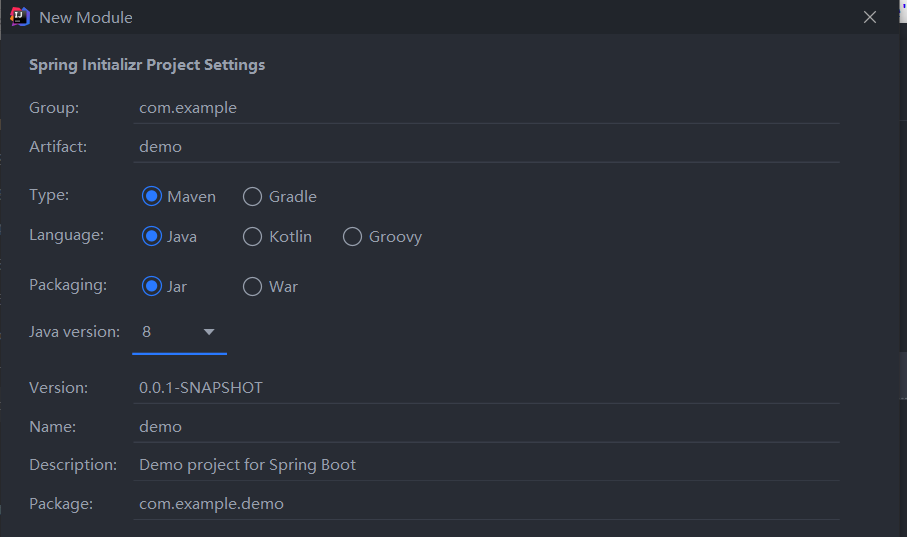
- 选择 Spring Web依赖

- 设置Module名
- 新建handler类
package com.example.demo; import org.springframework.web.bind.annotation.RequestMapping; import org.springframework.web.bind.annotation.RestController; @RestController public class DemoHandler { @RequestMapping("/hello") public String Hello() { return "Hello SpringBoot"; } } - 浏览器访问 http://localhost:8080/hello
2. 使用
2.1 包扫描规则
- SpringBoot默认扫描 主启动类所在的包及其子包
- 可以在主启动类上通过
ComponentScan注解指定要扫描的包,此时约定规则会失效
2.2 父工程
- 我们的工程都继承自 spring-boot-starter-parent 父工程
- spring-boot-starter-parent 工程又继承自 spring-boot-dependencies
- 默认没有集成 mybatis, 可以通过mybatis提供的 starter
2.3 配置文件
- 配置文件放在 main/resources 目录下,有两种格式:
- application.properties
- application.yml
- 可以只用一个,也可以两个一起用,冲突时以properties文件为准
- properties文件:
- 属性顶格写
- 格式:属性=值
- 示例
server.port=8081
server.servlet.context-path=/atguigu
2.4 yml文件
格式:
键: 值,注意冒号右侧有一个空格值的类型
- 字面量:字符串、数值、布尔类型,设置密码时如以0开头会被认为是8进制,需要加引号
- 对象、Map
- 常规写法
student: stu-id: 15 stu-name: tom subject: java - 行内写法
student: {stu-id: 15, stu-name: tom, subject: java}
- 常规写法
- 数组:使用
-表示数组中的元素,其后需要一个空格subject: - java - python - c++
读取
application.yml
student:
    stu-id: 15
    stu-name: tom
    graduated: false
    subject:
        - java
        - php
        - python
    birthday: 1996/05/12
    teachers:
        java: tom
        php: jerry
        python: rechal
    address:
        province: 江苏
        city: 南京
        street: 将军大道
my.best.wishes: "Happy new year!"
新建Student类
@Component
@ConfigurationProperties(prefix = "student")
public class Student {

    private Integer stuId;
    private String stuName;
    private Boolean graduated;
    private String[] sunject;

    // 如果不使用DateTimeFormat指定格式,则必须使用默认格式 1996/12/27
    // @DateTimeFormat(pattern = "yyyy-MM-dd- HH:mm:ss")
    private Date birthday;
    private Map<String, String> teachers;
    private Address address;

    // 构造器、tostring、getter、setter
}
新建Address类
public class Address {

    private String province;
    private String city;
    private String street;

    // 构造器、tostring、getter、setter
}
导入依赖
<dependency>
    <groupId>org.springframework.boot</groupId>
    <artifactId>spring-boot-configuration-processor</artifactId>
</dependency>
测试
@Autowired
private Student student;

@Value("${my.best.wishes}")
rivate String wishes;

@Test
public void testReadYaml() {

    logger.info(student.toString());
    logger.info(wishes);
}
修改日志级别
logging:
level:
    com.atguigu.spring.boot: debug
    #root: debug #全局
2.5 SpringBoot相关注解
@Configuration:配置类@Bean:将类加载进IOC容器@Import:比Bean标签更便捷地将类加入 IOC 容器@Configuration @Import(类名.class) public class SpringAnnotationConfig { // ... }@Conditional:类满足特定条件时才加入 IOC 容器@ComponentScan:扫描//Spring的配置类 @Configuration @ComponentScan(value = "org.codeaction", useDefaultFilters = false, // 不关闭则include只能追加,关闭后表示只扫描include的包 includeFilters = { @Filter(type = FilterType.ANNOTATION, classes = Controller.class) }, excludeFilters = { @ComponentScan.Filter( type = FilterType.ANNOTATION, classes = {org.springframework.stereotype.Controller.class}) // 多个类用集合 }) public class SpringAnnotationConfig { // ... }@SpringBootConfiguration:Configuration注解的SpringBoot版@AutoConfigurationImportSelector:启用自动化配置@AutoConfigurationPackage:指定自动化配置的类@SpringBootApplication:表示当前类是一个 SpringBoot 应用,包含@SpringBootConfiguration、@EnableAutoConfiguration、@ComponentScan注解
2.6 SpringBoot工作原理
3. 整合 MyBatis
3.1 引入依赖
- SpringBoot相关依赖
<dependency> <groupId>org.springframework.boot</groupId> <artifactId>spring-boot-starter</artifactId> </dependency> <dependency> <groupId>org.springframework.boot</groupId> <artifactId>spring-boot-starter-test</artifactId> <scope>test</scope> </dependency> <!-- https://mvnrepository.com/artifact/org.springframework.boot/spring-boot-configuration-processor --> <dependency> <groupId>org.springframework.boot</groupId> <artifactId>spring-boot-configuration-processor</artifactId> </dependency> - springBoot父工程中不包含 MyBatis,因此需要自己引入并指定版本
<dependency> <groupId>org.mybatis.spring.boot</groupId> <artifactId>mybatis-spring-boot-starter</artifactId> <version>2.1.3</version> </dependency> <!-- 父工程中有因此无需指定版本 --> <dependency> <groupId>mysql</groupId> <artifactId>mysql-connector-java</artifactId> <scope>runtime</scope> </dependency> <!-- https://mvnrepository.com/artifact/com.alibaba/druid --> <dependency> <groupId>com.alibaba</groupId> <artifactId>druid</artifactId> <version>1.2.4</version> </dependency> - 插件
<!-- Maven构建过程相关配置 -->
<build>
    <!-- 构建过程中所需要用到的插件 -->
    <plugins>
        <!-- 将SpringBoot应用打包成可执行的jar包 -->
        <plugin>
            <groupId>org.springframework.boot</groupId>
            <artifactId>spring-boot-maven-plugin</artifactId>
            <configuration>
                <excludes>
                    <exclude>
                        <groupId>org.springframework.boot</groupId>
                        <artifactId>spring-boot-configuration-processor</artifactId>
                    </exclude>
                </excludes>
            </configuration>
        </plugin>
    </plugins>
</build>
3.2 数据库表
新建数据库并授权(root用户)
# springboot
CREATE DATABASE `springboot` CHARACTER SET utf8;
GRANT ALL PRIVILEGES ON springboot.* TO 'Jacob'@'%';
新建数据库表
# SpringBoot测试
USE springboot;
CREATE TABLE `table_emp`(
    emp_id INT NOT NULL AUTO_INCREMENT,
    emp_name VARCHAR(400) NULL,
    emp_age INT NULL,
    PRIMARY KEY (emp_id)
);
3.3 类相关配置
- 新建实体类 Emp
public class Emp { private Integer empId; private String empName; private Integer empAge; // 构造器... } - mapper
resources/mybatis/mapper/EmpMapper.xmlpackage com.atguigu.spring.boot.mapper; import com.atguigu.spring.boot.entity.Emp; import java.util.List; public interface EmpMapper { List<Emp> selectAll(); }<?xml version="1.0" encoding="UTF-8" ?> <!DOCTYPE mapper PUBLIC "-//mybatis.org//DTD Mapper 3.0//EN" "http://mybatis.org/dtd/mybatis-3-mapper.dtd"><!--指定约束文件--> <mapper namespace="com.atguigu.spring.boot.mapper.EmpMapper"> <select id="selectAll" resultType="com.atguigu.spring.boot.entity.Emp"> select emp_id empId, emp_name empName, emp_age empAge from table_emp </select> </mapper>
3.4 springboot配置
application.yml
spring:
datasource:
    name: mydb
    type: com.alibaba.druid.pool.DruidDataSource
    url: jdbc:mysql://127.0.0.1:3306/springboot?serverTimezone=UTC
    username: Jacob
    password: jacob12015229
    driver-class-name: com.mysql.cj.jdbc.Driver
mybatis:
mapper-locations: classpath*:/mybatis/mapper/*Mapper.xml
logging:
level:
    com.atguigu.spring.boot.mapper: debug
    com.atguigu.spring.boot.test: debug
主启动类
package com.atguigu.spring.boot;

import org.mybatis.spring.annotation.MapperScan;
import org.springframework.boot.SpringApplication;
import org.springframework.boot.autoconfigure.SpringBootApplication;

@MapperScan("com.atguigu.spring.boot.mapper")
@SpringBootApplication
public class SpringBootMainClass {

    public static void main(String[] args) {
        SpringApplication.run(SpringBootMainClass.class,args);
    }
}
测试类
package com.atguigu.spring.boot.test;

import com.atguigu.spring.boot.entity.Emp;
import com.atguigu.spring.boot.mapper.EmpMapper;
import org.junit.Test;
import org.junit.runner.RunWith;
import org.slf4j.Logger;
import org.slf4j.LoggerFactory;
import org.springframework.beans.factory.annotation.Autowired;
import org.springframework.boot.test.context.SpringBootTest;
import org.springframework.test.context.junit4.SpringRunner;

import java.util.List;

@RunWith(SpringRunner.class)
@SpringBootTest
public class MyBatisTest {

    Logger logger = LoggerFactory.getLogger(MyBatisTest.class);

    @Autowired
    private EmpMapper empMapper;

    @Test
    public void testSave() {

        List<Emp> list = empMapper.selectAll();
        for (Emp emp:list) {
            logger.debug(emp.toString());
        }
    }
}
4. 整合 Redis
4.1 环境搭建
新建Maven项目,引入依赖
<parent>
    <groupId>org.springframework.boot</groupId>
    <artifactId>spring-boot-starter-parent</artifactId>
    <version>2.4.1</version>
    <relativePath/> <!-- lookup parent from repository -->
</parent>
<groupId>com.atguigu</groupId>
<artifactId>pro07-springboot-redis</artifactId>
<version>0.0.1-SNAPSHOT</version>
<name>pro07-springboot-redis</name>
<description>Demo project for Spring Boot</description>

<properties>
    <java.version>1.8</java.version>
</properties>

<dependencies>
    <dependency>
        <groupId>org.springframework.boot</groupId>
        <artifactId>spring-boot-starter-data-redis</artifactId>
    </dependency>

    <dependency>
        <groupId>org.springframework.boot</groupId>
        <artifactId>spring-boot-starter-test</artifactId>
        <scope>test</scope>
    </dependency>
</dependencies>

<build>
    <plugins>
        <plugin>
            <groupId>org.springframework.boot</groupId>
            <artifactId>spring-boot-maven-plugin</artifactId>
        </plugin>
    </plugins>
</build>
配置文件指定Redis端口号
spring:
redis:
    host: 127.0.0.1
4.2 Redis配置
- 下载Redis到本地(方便起见这里用Windows版本地安装)
- 启动Redis
redis-server.exe redis.windows.conf
4.3 使用
- 新建主启动类
- 新建测试类
- 原始方式使用Redis保存字符串
@RunWith(SpringRunner.class) @SpringBootTest class RedisTest { @Autowired private RedisTemplate<Object,Object> redisTemplate; @Autowired private RedisTemplate<String, String> myStringRedisTemplate; @Test public void testMyStringRedisTemplate() { ValueOperations<String, String> operations = myStringRedisTemplate.opsForValue(); String key = "happy"; String value = "new year"; operations.set(key, value); } @Test public void testRedisTemplate() { // 1.获取用来操作String类型数据的ValueOperation对象 ValueOperations<Object, Object> operations = redisTemplate.opsForValue(); // 2.借助ValueOperations对象存入数据 Object key = "good"; Object value = "morning"; operations.set(key, value); // 3.尝试读取刚才设置的数据 Object readValue = operations.get(key); System.out.println(readValue); } } - 封装好的字符串方式
@Autowired
private StringRedisTemplate stringRedisTemplate;

@Test
public void testListOperation() {
    ListOperations<String, String> opsForList = stringRedisTemplate.opsForList();

    opsForList.leftPush("fruit", "apple");
    opsForList.leftPush("fruit", "banana");
    opsForList.leftPush("fruit", "watermelon");
}

@Test
public void testStringRedisTemplate() {

    // 1.获取ValueOperation对象
    ValueOperations<String, String> operations = stringRedisTemplate.opsForValue();

    // 2.准备数据
    String key = "seu";
    String value = "Southeastern University";

    // 3.执行设置
    operations.set(key, value);
}
5.整合 Thymeleaf
5.1 Thymeleaf简介
5.2 环境搭建
- 新建 Maven 工程,加入依赖
<parent> <groupId>org.springframework.boot</groupId> <artifactId>spring-boot-starter-parent</artifactId> <version>2.4.1</version> <relativePath/> <!-- lookup parent from repository --> </parent> <groupId>com.atguigu</groupId> <artifactId>pro08-spring-boot-thymeleaf</artifactId> <version>0.0.1-SNAPSHOT</version> <name>pro08-spring-boot-thymeleaf</name> <description>Demo project for Spring Boot</description> <properties> <java.version>15</java.version> </properties> <dependencies> <dependency> <groupId>org.springframework.boot</groupId> <artifactId>spring-boot-starter</artifactId> </dependency> <dependency> <groupId>org.springframework.boot</groupId> <artifactId>spring-boot-starter-web</artifactId> </dependency> <dependency> <groupId>org.springframework.boot</groupId> <artifactId>spring-boot-starter-test</artifactId> <scope>test</scope> </dependency> <dependency> <groupId>org.springframework.boot</groupId> <artifactId>spring-boot-starter-thymeleaf</artifactId> </dependency> </dependencies> <build> <plugins> <plugin> <groupId>org.springframework.boot</groupId> <artifactId>spring-boot-maven-plugin</artifactId> </plugin> </plugins> </build> - 创建主启动类
- 配置文件 application.yml
spring: thymeleaf: prefix: classpath:/templates/ suffix: .html cache: false #开发时禁用缓存 - 新建handler:
@Controller public class TestTemplateHandler { @RequestMapping("/test/thymeleaf") public String testThymeleaf() { return "hello"; } } - resources目录下新建 templates/hello.html 文件
<!-- 加入名称空间 -->
<html lang="en" xmlns:th="http://www.thymeleaf.org">
<head>
    <meta charset="UTF-8">
    <title>Title</title>
</head>
<body>

    <p th:text="经过服务器处理后可以看到的内容">直接在浏览器上打开时可以看到的内容</p>

</body>
</html>
5.3 Thymeleaf使用
修改标签文本值
<h3>替换标签文本值</h3>
<p th:text="经过服务器处理后可以看到的内容">直接在浏览器上打开时可以看到的内容</p>
修改指定属性值
<h3>替换属性值</h3>
<input type="text" value="原始值" th:value="替换值">
在表达式中访问属性域
@Autowired private ServletContext servletContext; @RequestMapping("/test/thymeleaf") public String testThymeleaf(ModelMap modelMap, HttpSession session) { // 1.将测试数据存入请求域 modelMap.addAttribute("attrNameRequestScope","attrValueRequestScope"); // 2.将测试数据存入会话域 session.setAttribute("attrNameSessionScope","attrValueSessionScope"); // 3.将测试数据存入应用域 servletContext.setAttribute("attrNameAppScope","attrValueAppScope"); return "hello"; }<h3>访问属性域</h3> <p th:text="${attrNameRequestScope}">访问请求域:方式一</p> <p th:text="${#httpServletRequest.getAttribute('attrNameRequestScope')}">访问请求域:方式二</p> <p th:text="${session.attrNameSessionScope}">访问Session域</p> <p th:text="${application.attrNameAppScope}">访问Application域</p>URL解析
<h3>获取contextPath值</h3>
<p th:text="@{/aaa/bbb/ccc}">@{}作用是把contextPath的值附加到指定的地址前</p>
# 默认的contextPath为空,可以在配置文件中设置: server: servlet: context-path: /atguigu直接执行表达式
<h3>直接执行表达式</h3>
<p>有转义效果:[[${attrNameRequestScope}]]</p>
<p>无转义效果:[(${attrNameRequestScope})]</p>
条件判断
<h3>判断字符串是否为空</h3>
<p th:if="${not #strings.isEmpty(attrNameRequestScope)}">attrNameRequestScope不为空</p>
~<p th:if="${#strings.isEmpty(attrNameRequestScope)}">attrNameRequestScope为空</p>~
遍历集合
// 4.为了测试集合的遍历,需要把集合存入请求域 modelMap.addAttribute("list", Arrays.asList("AAA","BBB","CCC","DDD"));<h3>遍历集合</h3> <div> <p th:text="${str}" th:each="str : ${list}"></p> </div>包含其它模板文件
<!-- 新建resources/templates/include/part.html -->
<h3>包含页面片段</h3>    <div th:fragment="myFirstPart">
    <p>content that will be included [first]</p>
</div>

<div th:fragment="mySecondPart">
    <p>content that will be included [second]</p>
</div>

<div th:fragment="myThirdPart">
    <p>content that will be included [third]</p>
</div>
<!-- :: 左值拼前后缀后为要包含的文件 --> <!-- :: 右值为代码片段名 --> <div th:insert="~{include/part::myFirstPart}"></div> <div th:replace="~{include/part::mySecondPart}"></div> <div th:include="~{include/part::myThirdPart}"></div>